JKI’s VI Tester is a LabVIEW unit testing framework that helps developers write and execute automated tests to guarantee their software components work as designed. Although this usually means verifying that software components meet certain functional requirements, VI Tester can be used for creating other kinds of software tests, too. Instead of finding bugs, these tests can do things like perform status and configuration checks on your software, and work around pain points in the LabVIEW build process. Let's look at one example.
LabVIEW Checks for Broken VIs Late in the Build Process
Recently I was working for a JKI customer on a very large piece of LabVIEW software. The development team was trying to optimize the application's half-day-long build process. One of the problems we faced was that occasionally there were broken VIs in the build but it took hours before the LabVIEW Application Builder returned an error to notify us about them. This feedback was too slow, as often the new build was needed for the next day and starting another build meant several lost hours.
Our solution was to create a Test Case in VI Tester that tests if the application is OK to build (i.e. if any module's Run Arrow is broken). It provides nearly instant feedback to the development team because it runs as the very first step of the build process. I’ll show you how we did it.
How to Quickly and Automatically Test Your Build for Broken VIs
How can you create a test case to test broken code, since doing so would cause the test case itself to be broken?
First, create an empty VI Tester test case class. By default, a test case class consists of three VIs: a setUp.vi, a tearDown.vi and a VI template for individual tests. You don’t need to worry about the setUp or tearDown steps in this test case; just use the default templates for these two VIs. Just create the test VI by renaming the template to something that begins with “test.” In this example we will call it testBuildTree.vi.

Second, we need to write the content of the actual unit test. The idea behind this unit test is very simple. We create a VI outside the test case class called BuildTree.vi. On the block diagram of this VI we place all the files defined in the Source Files section of your executable build definition (marked with yellow label in the illustration below).
Wire up all the required inputs of the VIs you dropped on the block diagram to ensure that BuildTree.vi itself is not broken. Don’t worry about whether the data you connect is valid; BuildTree.vi is never actually executed so you don’t need to worry about whether the code would actually do anything if you ran it.
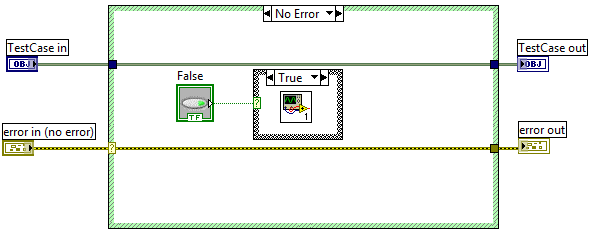
Next open the testBuildTree.vi test from the test case class. Create an empty case structure on the block diagram, and wire a boolean control to the selector input of the case structure as shown below. Drop the just created BuildTree.vi to the True case of the case structure and leave the False case empty. Make sure the default value of the boolean control is false so that the True case of the case structure never executes.
That’s it. Your test case finished. When VI Tester tries to execute the test case, any broken code in BuildTree.vi will cause the test case class to fail to load. VI Tester will simply mark the test case as failed and continue with the next test case.
Verify That It Works
To validate your test case, add the test case class to your project, save the project and open VI Tester from LabVIEW Tools menu (Tools -> VI Tester -> Test VIs…). VI Tester will automatically find the test case in your project. Execute the test case by pressing the green arrow in the main user interface of the VI Tester. If one of the VIs in your build is broken, the test case will fail and your broken build is properly reported by your unit test.


